
If you’ve noticed your energy bills climbing over the last several months, you might be looking at replacement windows to save money at home. New, energy-efficient windows can help you improve your indoor comfort while taking some stress off your HVAC system. Of course, when you are thinking about this home renovation project, you will need to know how to install replacement windows. This is a job that may seem deceptively simple. And unfortunately, many homeowners will try to make it a DIY task only to end up needing professional help later.
Why Professional Installation Is Best for Replacement Windows
When you need replacement windows, it’s usually best to call the pros from the start of your project. There is a lot to think about when installing new windows, but the pros can help. For example, you’ll need to select the right energy-efficient windows for the regional climate. You’ll also need to decide on the style and layout you prefer. In addition, you need to know what size your new windows should be. Poorly fitted windows can cause a variety of problems for your home—including unwanted heat loss through window openings. While there are several standard window sizes available, not all homes follow these standards.
When it comes to installing replacement windows, you should look beyond your own home repair skills. If you make a mistake installing a new window, you’re stuck with it. If a professional contractor makes a mistake, you’ll likely be covered with warrantied repairs. In addition, errors are much less likely with the professional approach.
Steps in the Process
Once you make the decision to call a professional contractor specializing in window replacement, the process is simple. Here is a look at what you can expect.
Step 1 – Take Measurements
When you call a window repair specialist, you will likely schedule an in-home estimate for your project. During this estimate, your contractor will measure all window openings to accurately determine the appropriately sized windows for the job. In some cases, custom windows will be fabricated to fit oversized or oddly shaped window openings. Windows should have a snug fit so that they function properly and offer optimal energy efficiency.
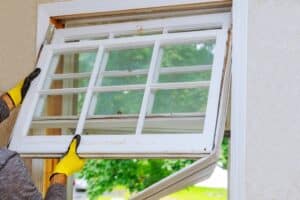
Step 2 – Remove the Old Window
Once you select replacement windows, it’s time to remove the old windows. If your home was built before 1978, there is a good chance that there is lead paint present. Therefore, precautions must be taken to avoid inhalation of toxic paint as the window opening is stripped of screws and the old window sash. In addition, older windows may be installed with springs, which can become dislodged and pose a safety risk as the window is removed. Thus, it is especially helpful to contact the pros when replacing old windows. However, homes of any age will benefit from the help of a professional contractor in window replacement. To properly remove the window, your contractor will need to access both the interior and exterior of your home.
Step 3 – Install the New Window
First, the window openings will be thoroughly cleaned to remove dust and debris. Then, flashing tape is installed to secure the window opening. The installer will also check to make sure the sill is level. If there is bowing, they will make adjustments to create a level surface before installation. The next step is dry fitting, where the window is placed in the opening to double check the fit. Next, silicone caulking is applied around the window opening. Finally, the window is put in place and installed with permanent screws. To complete the project, your installer will measure and inspect the replacement windows and then clean up any remaining materials.
For a hassle-free installation process with your replacement windows, call the experts at Crandell Glass & Aluminum in Tucson. You can reach us at (520) 512-5042 to schedule your free project estimate.